Some additional information about my new wrap dress.
I decided to wear my new dress out last night before it made it to the washing machine and before it got a hem.
Generally I liked the way it wore, it's very comfortable the fabric is soft and the skirt drapes nicely.
BUT: It really is a size too big, and the shoulders are too wide so they kept slipping off my shoulders and due to the crossover design at the back as well if I didn't catch my sleeve straight away I was in danger of a very major "wardrobe malfunction". In other words the bodice could end up wrapped neatly around my waist and I would be left showing everyone my entire bra not just the bra band!
I will modify this dress buy putting a strip across the back of the dress at the top of my shoulders to prevent any accidents. Then it will be an excellent "wearable muslin" to throw on when I feel like going to the shops or leaving the house for no particular reason.

Thursday 22 February 2007
Wednesday 21 February 2007
Learning to Sew with Knits. Part 2
Mock Wrap Dress
Spotlight were having a sale on Butterick patterns the other day so I grabbed a couple, including this one:
http://store.sewingtoday.com/cgi-bin/butterick/shop.cgi?s.item.B4788=x&TI='b4788'&page=1
I also got some chocolate jersey with a cream floral print which was reduced to $5 per metre. So this was going to be an ideal learning project.
I didn't make any pattern modifications as I wanted to see how the fit would be. I made view A in a size 18.
I did make construction changes as I am still not happy with my edge finishing. So after multiple practice runs on scrap fabric and examining the jersey dresses in my wardrobe I decided to make a band to finish the edges. I also did this to the sleeves.
Front:

Side with elastic casing ruching detail:

Back: I had not originally noticed that the back was a wrap as well. My biggest problem with this was the potential it would be too low to cover my bra band, but it all worked out OK, though if I do this again I would prefer a normal back. I will also make longer sleeves, possibly as long as elbow length.
 The side front without the ruching. I have tied a scrap of fabric around the waist and I think it gives the dress much more shape. I think I will have to make a tie out of the left over fabric. After looking at the fit if I make this dress again I will lengthen the bodice and possible make a size 16 as the shoulders are a little too wide and the sleeves are very loose.
 I am starting to feel a little more confident with my knit sewing. I haven't tackled the hem yet, I think I will give it a run though the washing machine the let it hang and stretch first. I might have to tackle a few more knit projects in my next week off work.
Thanks for looking.
Comments are always welcome.
Cat.
Sunday 18 February 2007
Knickers!
Ultra fast lacy knickers.
Still on the stretch theme. I made these in about 40 minutes by copying a pair of knickers I really like.
I am really happy with the separate crotch piece, I think it should make them a little more comfortable.
A close up of the lace.

They were really easy to make as I used a stretch lace the width I wanted them to be, but at $7 per metre they are not really cheap. I will be making more though, maybe it's time I started to source fabric from abroad.
Still on the stretch theme. I made these in about 40 minutes by copying a pair of knickers I really like.
I am really happy with the separate crotch piece, I think it should make them a little more comfortable.

A close up of the lace.

They were really easy to make as I used a stretch lace the width I wanted them to be, but at $7 per metre they are not really cheap. I will be making more though, maybe it's time I started to source fabric from abroad.
Learning to Sew with Knits.
A Singlet for Grandma
Quite a while ago, Mum asked if I could make some singlets for Grandma as the one's in the shop were generally too short. Rather hard to believe as she is 5' nothing. Anyway all the singlets mum could get seemed to finish about her waist and would always become untucked.
After a few attempts I had been very dissatisfied with my ability to sew knits. Constructing the garment on the over locker was a breeze but then it all went horribly wrong when I attempted to use my sewing machine to do the hems or necklines.
But I have decided that this week is my learn to sew with knits week. So I started with a singlet for Grandma.
I am satisfied with the result around the neck and arm holes. I think I understand the ideas a bit better now and should get better with practice. I will also try so other finishing techniques.

I am most happy with my hem. Finally I have had success with a twin needle! I think the problems previously were a combination of a non-stretch needle compounded with a too narrow gap and a very stretchy fabric.
The fabric in this project is a single cotton jersey, very soft but it was OK to work with. I just hope it fits her. I will have to get it in the post soon.

Well I have learned a few things, now for a few more projects with knits.
Quite a while ago, Mum asked if I could make some singlets for Grandma as the one's in the shop were generally too short. Rather hard to believe as she is 5' nothing. Anyway all the singlets mum could get seemed to finish about her waist and would always become untucked.
After a few attempts I had been very dissatisfied with my ability to sew knits. Constructing the garment on the over locker was a breeze but then it all went horribly wrong when I attempted to use my sewing machine to do the hems or necklines.
But I have decided that this week is my learn to sew with knits week. So I started with a singlet for Grandma.

I am satisfied with the result around the neck and arm holes. I think I understand the ideas a bit better now and should get better with practice. I will also try so other finishing techniques.

I am most happy with my hem. Finally I have had success with a twin needle! I think the problems previously were a combination of a non-stretch needle compounded with a too narrow gap and a very stretchy fabric.
The fabric in this project is a single cotton jersey, very soft but it was OK to work with. I just hope it fits her. I will have to get it in the post soon.

Well I have learned a few things, now for a few more projects with knits.
Thursday 8 February 2007
Scary 80's Pattern to Great Linen Skirt
Great fit from Scary 80's Pattern.
While browsing in a second hand book shop in their craft books section was a collection of these "Make it Easy" Magazines with patterns from 1984. I got a stash of 13 folders of patterns each with at least 2 garments all for $6. All multisize patterns , all printed on paper not tissue.
It was fun going through looking at all that BIG 80's hair, the amazingly shapeless garments and the young girls trying to look at least 10 years older. But a nice change to not see glorified hooker gear.
In this envelope there was a pattern for a basic straight skirt, so I thought I'd give it a go.
I copied the pattern size 16 but added 12mm on each side seam as I thought it would be just a little too snug otherwise. It was very simple, centre front cut on fold, 2 back pieces and a simple rectangular waist band. I used a linen that I had in my stash.
 This is the result. It fits so beautifully around my pot tummy and followed the curve of my back very well, I think I may have discovered my new favourite skirt. The fabric is a little stiff and a bit crumpled (but it is linen), but I think it will wear reasonably well. I top stitched down the seams and around the waist band and am quite happy with the result.

I know it may look a little mature but teamed with a cute top I think the fit will more than compensate for the older style. A really good work basic, looks great with sandals and possibly better with knee high boots. I just love the no gap above my bum, possibly because it has 2 darts gently shaping the back rather than a single dart.

It even has a walking pleat in the back seam. It really went together very quickly, the only slow part was I hand hemmed it. But I think it was worth it.
Thanks
Cat
While browsing in a second hand book shop in their craft books section was a collection of these "Make it Easy" Magazines with patterns from 1984. I got a stash of 13 folders of patterns each with at least 2 garments all for $6. All multisize patterns , all printed on paper not tissue.
It was fun going through looking at all that BIG 80's hair, the amazingly shapeless garments and the young girls trying to look at least 10 years older. But a nice change to not see glorified hooker gear.

In this envelope there was a pattern for a basic straight skirt, so I thought I'd give it a go.
I copied the pattern size 16 but added 12mm on each side seam as I thought it would be just a little too snug otherwise. It was very simple, centre front cut on fold, 2 back pieces and a simple rectangular waist band. I used a linen that I had in my stash.
 This is the result. It fits so beautifully around my pot tummy and followed the curve of my back very well, I think I may have discovered my new favourite skirt. The fabric is a little stiff and a bit crumpled (but it is linen), but I think it will wear reasonably well. I top stitched down the seams and around the waist band and am quite happy with the result.
I know it may look a little mature but teamed with a cute top I think the fit will more than compensate for the older style. A really good work basic, looks great with sandals and possibly better with knee high boots. I just love the no gap above my bum, possibly because it has 2 darts gently shaping the back rather than a single dart.

It even has a walking pleat in the back seam. It really went together very quickly, the only slow part was I hand hemmed it. But I think it was worth it.
Thanks
Cat
Wednesday 7 February 2007
Underwear.
What to wear under a skirt or dress to stop the thighs rubbing together.
I love skirts and a love to wear skirts in summer, but with large upper thighs there is an issue with chaffing. In summer I find it too hot to wear pantyhose or thigh control pants so when I saw this pattern for sale on ebay I thought it could be useful.
So from view 3 I made these:

They are made from a very light weight cotton voile with an elastic waist and cotton lace trim. They are much shorter than the pattern (they finish a little above my knees) as I have very stubby legs. I will probably make them again, at least once in a cotton lycra, for a more form fitting look and again in a soft cotton. When I make the cotton pair I will enlarge the thigh area and I may dart the waist in to a simple waist band with a button closure.
I love skirts and a love to wear skirts in summer, but with large upper thighs there is an issue with chaffing. In summer I find it too hot to wear pantyhose or thigh control pants so when I saw this pattern for sale on ebay I thought it could be useful.

So from view 3 I made these:

They are made from a very light weight cotton voile with an elastic waist and cotton lace trim. They are much shorter than the pattern (they finish a little above my knees) as I have very stubby legs. I will probably make them again, at least once in a cotton lycra, for a more form fitting look and again in a soft cotton. When I make the cotton pair I will enlarge the thigh area and I may dart the waist in to a simple waist band with a button closure.
Tuesday 6 February 2007
Skirt Body Construction
How to Put The Skirt Together
You should have a centre front panel (one if you cut it on the fold, 2 if you want a centre front seam), 2 centre back panels, 4 side panels, (optional 4 pocket pieces), waist band and interfacing.
VERY IMPORTANT!
Stay stitch all of the panel pieces around the waist curve just inside your seam allowance. My seam allowance was 1.5cm therefore my stay stitching line was at 1.3cm. This stops the waist curve from stretching out of shape and allows you to clip the curve so it will lay in a straight line when you attach the waist band.

Insert pockets in side seams if desired and sew side panels together. Make sure the pockets face forward on each side panel.

Sew centre front panel to side front panels, taking care not to stretch the fabric as you sew.

The skirt should look like this now. Both pockets face forwards and if you look at the larger image you should be able to see the stay stitching around the waist.

Insert a zip in the centre back seam. My preference is an invisible zip,, but put in any fastening system you like. Sew the centre back seam.
It is much easier to inset the zip in the back panels before you attach it to the skirt as there is a lot less material to deal with.

Sew the back panel to the side back panels, again taking care not to stretch the fabric as you sew. The skirt should now be a complete circle when laid flat on the floor.

Now very carefully clip the waist curve to the stay stitching, DO NOT CUT THE STITCHING, all the way around the waist.
Now very carefully try the skirt on for fit. If it is too small run another line of stay stitching all the way round the waist below the first line, clip to this point and retry the fit. If it is too big you can try taking it in at the side seams a little or ease fit/gather it onto the waist band.
When you are happy with the fit, attach the waist band. (I'll do this as a separate chapter, coming soon!)
This is essentially how to make any paneled skirt. More panels means more seams, fewer panels means fewer seams. It is generally easier to put pockets and zips in before the entire skirt is constructed so think about putting these in first.
Have fun playing with the concept and construction.
Monday 5 February 2007
Pink Cord Dress
A Pink Cord Dress for a Little Girl in the UK
This is a little jumper dress I've made for our friends baby. I saw some pink cord on sale at Spotlight and had recently bought some patterns for baby and children's clothes from my neighbour. So after looking through them nothing was quite right, so I used two patterns to make this one.

I decided to try doing an applique on the front, random shapes surrounded with variegated cotton satin stitch.

The back is a simple cross over with two buttons.
 I used the variegated thread for the button holes too.

I hope it fits her. I thought it would look cute with a long sleeved body suit and leggings.
I wasn't sure if I should have done more decoration, but decided to keep it simple for now. It if fits and looks good I might make another and do more detail on the next one.
This is a little jumper dress I've made for our friends baby. I saw some pink cord on sale at Spotlight and had recently bought some patterns for baby and children's clothes from my neighbour. So after looking through them nothing was quite right, so I used two patterns to make this one.

I decided to try doing an applique on the front, random shapes surrounded with variegated cotton satin stitch.

The back is a simple cross over with two buttons.
 I used the variegated thread for the button holes too.
I hope it fits her. I thought it would look cute with a long sleeved body suit and leggings.
I wasn't sure if I should have done more decoration, but decided to keep it simple for now. It if fits and looks good I might make another and do more detail on the next one.
In Seam Side Pockets
My method for attaching in seam side pockets without a pocket extension.
Lay pocket piece right side down on the garment side piece, matching waistline and side seams. Sew together within the seam allowance. My seam allowance is 1.5cm so the pocket was sewn on at 1cm from edge.
Fold pocket away from garment and press with seam towards the pocket and edge stitch on the pocket flap through the seam allowance as close to the seam as possible.
 Repeat for all pieces. As I was doing a pocket in each seam I now had four side pieces.

This is a close up of the edge stitching through the pocket flap (sorry upside down).

With right sides together match front and back side pieces and pin. I draw my stitching line in chalk.
 Then stitch from the waist down the side seam to the top of the pocket opening, backstitch to reinforce. Then stitch around the pocket and down the side seam at the full seam allowance (mine was 1.5cm). The pocket seam will now be enclosed within the pocket.

Repeat with other pocket and press seams to the front. Finish the raw edges in your favoured method.

Inseam pocket from outside complete.

Action shot.

Continue the rest of your garment.
This will work reasonably well on most things which are not very close fitting. If the fabric is particularly bulky the best thing is to put extensions on the side seam and make the pocket pieces out if a much lighter weight fabric.
Have fun putting pockets in your garments now. Don't be afraid to try different things too.
I hope this made sense.
Thanks
Cat.
Lay pocket piece right side down on the garment side piece, matching waistline and side seams. Sew together within the seam allowance. My seam allowance is 1.5cm so the pocket was sewn on at 1cm from edge.

Fold pocket away from garment and press with seam towards the pocket and edge stitch on the pocket flap through the seam allowance as close to the seam as possible.
 Repeat for all pieces. As I was doing a pocket in each seam I now had four side pieces.
This is a close up of the edge stitching through the pocket flap (sorry upside down).

With right sides together match front and back side pieces and pin. I draw my stitching line in chalk.
 Then stitch from the waist down the side seam to the top of the pocket opening, backstitch to reinforce. Then stitch around the pocket and down the side seam at the full seam allowance (mine was 1.5cm). The pocket seam will now be enclosed within the pocket.
Repeat with other pocket and press seams to the front. Finish the raw edges in your favoured method.

Inseam pocket from outside complete.

Action shot.

Continue the rest of your garment.
This will work reasonably well on most things which are not very close fitting. If the fabric is particularly bulky the best thing is to put extensions on the side seam and make the pocket pieces out if a much lighter weight fabric.
Have fun putting pockets in your garments now. Don't be afraid to try different things too.
I hope this made sense.
Thanks
Cat.
Sunday 4 February 2007
Circle Skirt: Pattern Layout and Cutting Guide
Fabric Layout Options for the Circle Skirt:
Here are a few examples of how to potentially layout and cut the pattern for a gored circle skirt. The wider the fabric is the longer your skirt can potentially be. All these options are for plain fabric or patterns without obvious direction.
I always cut the waistband longer than I need and cut it down after fitting it to the skirt.
I always cut the front panel on the fold so I eliminated the centre front seam, this is entirely optional, just do it the way you like best. My skirts have an uneven number of panels.
This is a layout for a basic circle skirt with waist band and no pockets.
 This was the layout I used, not quite as economical fabric wise but I fit the pocket pieces into the extra fabric at either end. The fabric I used was 112cm (44 inches) wide.

This is another option where you can utilise the full width of the fabric, I used a similar layout when I made my circle petticoat. I cut the 2 pieces on the fold, so there were only 2 side seams. I was able to get a good length out of fabric only 90cm (35 inches) wide. With this option you can make a 2, 4 or 8 piece skirt.

I always tried to have the side and centre back seams running parallel to the straight grain. This gives strength to the seams to support the side pockets and the back zipper.
Always try moving the pattern pieces around to find the way that is best for your particular project.
Try using a very cheap cotton first just to see how it all works.
I hope this has been helpful.
Here are a few examples of how to potentially layout and cut the pattern for a gored circle skirt. The wider the fabric is the longer your skirt can potentially be. All these options are for plain fabric or patterns without obvious direction.
I always cut the waistband longer than I need and cut it down after fitting it to the skirt.
I always cut the front panel on the fold so I eliminated the centre front seam, this is entirely optional, just do it the way you like best. My skirts have an uneven number of panels.
This is a layout for a basic circle skirt with waist band and no pockets.
 This was the layout I used, not quite as economical fabric wise but I fit the pocket pieces into the extra fabric at either end. The fabric I used was 112cm (44 inches) wide.
This is another option where you can utilise the full width of the fabric, I used a similar layout when I made my circle petticoat. I cut the 2 pieces on the fold, so there were only 2 side seams. I was able to get a good length out of fabric only 90cm (35 inches) wide. With this option you can make a 2, 4 or 8 piece skirt.

I always tried to have the side and centre back seams running parallel to the straight grain. This gives strength to the seams to support the side pockets and the back zipper.
Always try moving the pattern pieces around to find the way that is best for your particular project.
Try using a very cheap cotton first just to see how it all works.
I hope this has been helpful.
Saturday 3 February 2007
Pattern Drafting for Circle Skirt
Gored Circle Skirt:

Create pattern:
Measure your waist add wearing ease (about 5cm or 2 inches).
Total waist circumference (TWC) = waist + ease
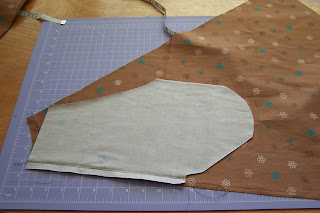
To get the pattern the right size I started with a large piece of brown wrapping paper (news paper or butchers paper would be great.
And folded it at the corner to make a large triangle

Then use the formula
TWC / 3.1416 = diameter
Diameter/2=radius
Measure from the tip of the triangle down each side the radius distance and connect the points with a curve.

Measure from the curve down each side of the paper to the length you want the skirt to be and connect with a curve.

This is the basic pattern for an 8 gored circle skirt (above left). Now if you left the paper folded while you did this open it out and it will look like this (above right).
This is a pattern you can use for a 4 or 2 gored circle skirt.
Don’t forget to add seam allowance to all edges when you cut.
Waist band:
This is a rectangle
Length = is waist + ease + overlap + seam allowance.
Width = (finished width x 2) + (seam allowance x 2)
Introduction
Hi,
I have decided to try showing my creative pursuits in this manner.
I will be initially setting up a tutorial for a skirt which I drafted the pattern for and made.
I will then also attempt to post information about my latest creations as I go.
Please be patient as I learn.
Thanks
Cat
I have decided to try showing my creative pursuits in this manner.
I will be initially setting up a tutorial for a skirt which I drafted the pattern for and made.
I will then also attempt to post information about my latest creations as I go.
Please be patient as I learn.
Thanks
Cat
Subscribe to:
Posts (Atom)